
I suppose this could be considered a continuation off of here, only I'm using a different model. I've found people do rigging different ways, but the most effective way I've found is like this.

So, here I've got my model, took a couple hours, but is at this point one object, uno, ein, un. After you've got your object finished, add a single armature, set it inside your model and change the display of the armature to x-ray, like so.


So, here I've got my model, took a couple hours, but is at this point one object, uno, ein, un. After you've got your object finished, add a single armature, set it inside your model and change the display of the armature to x-ray, like so.

As I go through making the skeleton, I'll be naming each bone, although once one is created there is already a preset name, however naming them myself seems to be easier. You can check the Name button in the Display menu in order to see the name of each bone as you go along (To rename individual bones, in edit mode, click on the little tab with the bone image and there is a name option for each individual bone). You can branch a bone of another by going into edit mode (TAB key) and clicking on the little ball and extruding (E key) in any direction.

This is what the skeleton looks like now, all named and placed. Now it's time for making the vertex groups. Select the model and go into edit mode.

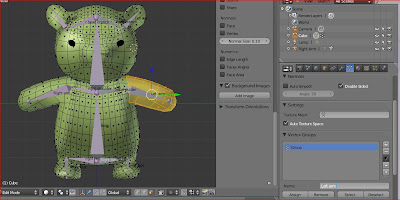
Select the vertices for a certain portion of a body and go to the vertices tab and go to the vertex group tab. Here you can name the vertices in the portion you selected, in order for rigging to go smoothly later on, the name must be exactly like the name of the bone; it is case, space, and punctual sensitive. For example, I've selected all the vertices in the general region of the "Left arm" and I have named the group thus. After you have it named, hit assign, select, then deselect. To make sure if the assignment work, click the group and click select. The vertices assigned to that group should be highlighted. Make sure to make a new group for each 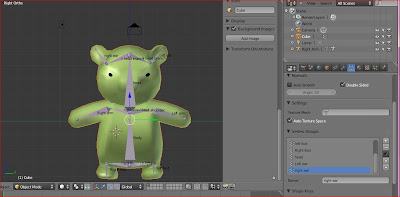

And that is the bear with all of it's groups and stuff. This last step is the easiest. Select the object and then the armature, hit CTRL P and click Armature Deform.

Now, if you select the armature and go into pose mode, simply move one of the armature bones and the vertices assigned to it should move with it.

With your object rigged, you are now ready for animating. If you have any questions, feel free to email the blog.
Comments
Post a Comment