
Blender obviously gives you all the tools you need to make a gun, so this shall be a tutorial on how to make one
Something you probably want to use is a reference image, however, if you understand what a gun looks like or if you have your own gun design in mind, you may not need one. For those of you who want to use a reference image, press N on your keyboard to bring up a new menu. Scroll down to the Background submenu and click the checkbox by it. Click the add image button and it will come up with more stuff. Click the file button to pull up and upload menu and click the image file you want. Keep in mind that Blender can't upload .gif files, so if the image isn't importing, check to make sure that the image format isn't .gif.


but through much of the making of it so far, I've kept the modeling preview in wire-frame, which you can switch to just by pressing Z. This allows you to manipulate all the vertices, edges, and faces, but also allow you to see the reference image. Making a gun is really no different from any other model, using tools like loop cut, stretch, grab, rotate, etc. but I'm going to use a different tool than I usually do.
In order to keep everything proportional, I want to make everything all at once rather than multiple separate objects at different times, however, I want the clip and the scope to be detachable.
 What you do is highlight all the faces you want separate from the rest of it, this can be made easier by staying in wireframe mode and using the box tool (B key) to select the faces.
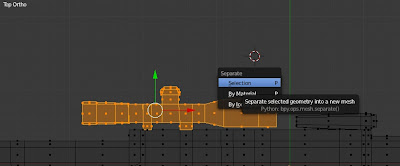 The press P, which should come up with options like this:
Click the first option, selection, which will separate the the faces selected from the rest of the model.
 And voila! Your selection should turn into a single outline without all extra details. This just means that it is incompatible in edit because it is no longer the primary subject in it. You can return to object mode, select the separated object, and go into edit mode with it separate from the original model.
 If you want to join the two objects back together, go to object mode and select both of them by holding down Shift. Then, in your toolbox, press the join button to bring them back together.
Something you probably want to use is a reference image, however, if you understand what a gun looks like or if you have your own gun design in mind, you may not need one. For those of you who want to use a reference image, press N on your keyboard to bring up a new menu. Scroll down to the Background submenu and click the checkbox by it. Click the add image button and it will come up with more stuff. Click the file button to pull up and upload menu and click the image file you want. Keep in mind that Blender can't upload .gif files, so if the image isn't importing, check to make sure that the image format isn't .gif.
If the file format isn't a .gif, but the image still isn't rendering, press the 5 key and this should show the image. Also, a default opacity for a background is 50% (0.500) but you can change this by double click the opacity bar under the back ground settings and then typing in a new number (0.01 thru 1.0) Another thing to remember is that the image will only be visible in orthographic views, so it's a good idea to keep another window open to keep at a different perspective. You can do this by clicking and dragging the little lines in the top right corner to divide the blender screen.
You can join it into one screen gain by right clicking the divider and click join.
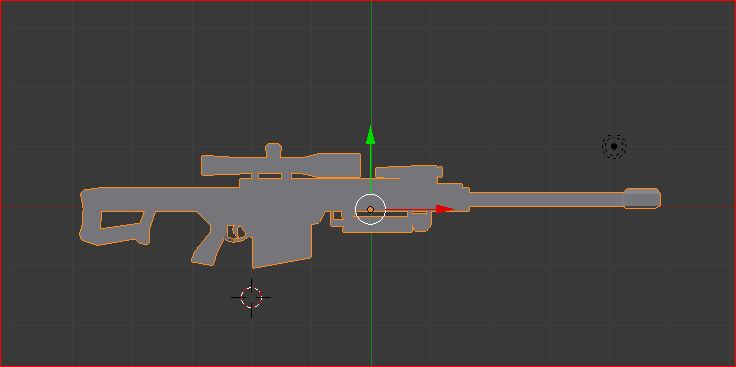
Alright, now time to actually start on the gun. Gun models are pretty damn simple, mostly because one side is symmetrical to the other and also guns are primarily geometric. I've already started on a Barrett 50 cal.

In order to keep everything proportional, I want to make everything all at once rather than multiple separate objects at different times, however, I want the clip and the scope to be detachable.
 |
| Completed model |
 What you do is highlight all the faces you want separate from the rest of it, this can be made easier by staying in wireframe mode and using the box tool (B key) to select the faces.
 The press P, which should come up with options like this:
Click the first option, selection, which will separate the the faces selected from the rest of the model.


Comments
Post a Comment