When making a game with a character, you don't want that character to be clothe-less (right?) So what you need are some cloth with a cloth effect, you don't want your character to look like a lego, do you? (do you?) So here's a tutorial on how to apply the cloth texture to your object using Blender 2.57.
So, this isn't a tutorial on how to make your character look amazing super awesome with realistic cloth effects, but more of an introduction to apply cloth effects and adjusting to the different materials and physics. Stuff I'll be mentioning for the first time is collision, which basically is required for an object so literally, two objects can collide.
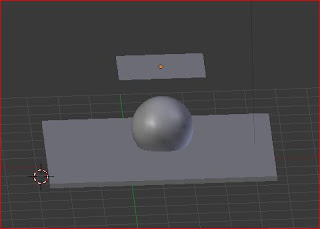
First, I set up a scene that looks something like this:
 To toggle between the toolbox and full screen, press T.

You want to click on the collision button to add the colliding attribute so that when the plane hits the UV Sphere, they will actually collide instead of the plane falling right through. Do the same with the elongated cube below the UVS.
Now, click on the plane and go into edit mode (Tab) and press hotkey W and click subdivide. After you click that, a little tab should pop up on your toolbox asking how many times you want to cut it, for the sake of the lesson, do no more than ten unless you want your computer to lag.
After you've done that, go ahead and go back to object mode, and with your plane selected, go back to the physics tab and add the cloth effect. Once you've done this, press Alt+A to play the animation. The plane should fall to the UVS and crumple around it, and then slide onto the elongated cube. From the cloth presets tab under the physics tab, you can even change the type of cloth you want to use (cotton, denim, leather, rubber, or silk)
I added material color to the panel and UVS so you could see it better, this is the cloth-modified plane as it slips down the sphere.
I hope this tutorial helped, and if you have any questions, feel free to email the blog.
So, this isn't a tutorial on how to make your character look amazing super awesome with realistic cloth effects, but more of an introduction to apply cloth effects and adjusting to the different materials and physics. Stuff I'll be mentioning for the first time is collision, which basically is required for an object so literally, two objects can collide.
First, I set up a scene that looks something like this:
With an elongated cube, UV sphere (smoothed) and a plane (smoothed). (To smooth an object, consult the toolbox on the right side of your screen, and under the shadows tab there should be smooth or flat shadows option:
 To toggle between the toolbox and full screen, press T.
So once you've got your objects in place, we're ready to begin with the physics. First, select the UV Sphere and click on the physics tab (the tab on the farthest right with the bouncing ball.) You should come up with a menu like the one below.

You want to click on the collision button to add the colliding attribute so that when the plane hits the UV Sphere, they will actually collide instead of the plane falling right through. Do the same with the elongated cube below the UVS.
Now, click on the plane and go into edit mode (Tab) and press hotkey W and click subdivide. After you click that, a little tab should pop up on your toolbox asking how many times you want to cut it, for the sake of the lesson, do no more than ten unless you want your computer to lag.
After you've done that, go ahead and go back to object mode, and with your plane selected, go back to the physics tab and add the cloth effect. Once you've done this, press Alt+A to play the animation. The plane should fall to the UVS and crumple around it, and then slide onto the elongated cube. From the cloth presets tab under the physics tab, you can even change the type of cloth you want to use (cotton, denim, leather, rubber, or silk)
I added material color to the panel and UVS so you could see it better, this is the cloth-modified plane as it slips down the sphere.
I hope this tutorial helped, and if you have any questions, feel free to email the blog.


Comments
Post a Comment